


Imagine holding in your hands a material that is both simple and extraordinary — stiff, strong, and shaped not by factories but by the careful hands of people who understood its value. That material is deer rawhide. For countless generations, rawhide was more than just a byproduct of the hunt — it was a link between people, animals, and survival.
What is rawhide?
Unlike soft, tanned leather, rawhide is made by cleaning and drying the skin, leaving it firm and unyielding. And in that toughness lies its power.
Rawhide is a versatile material that was once essential to Native Americans’ daily life. Plains tribes crafted rawhide into parfleches — painted, folded storage cases that were lightweight yet durable for carrying food and supplies during seasonal migrations. Strips of wet rawhide, which shrink and harden as they dry, were used as lashings to bind tools, secure arrowheads, or repair equipment.
Rawhide also played an important role in ceremony and art. It was stretched across drums to produce resonant tones and was often decorated with symbolic designs.
Early European settlers and frontiersmen adopted similar practices, using deer rawhide for snowshoes, tack, and tool repair because of its strength and accessibility.
Making rawhide represented a philosophy of resourcefulness and respect that ensured more parts of the animal were used and carried forward knowledge passed down through generations.
Hide to rawhide
There are many ways to turn a fresh deer hide into rawhide. The following method is a reliable place to start, but don’t be afraid to explore other approaches and adapt the process to what works best for you.
Removing the hide
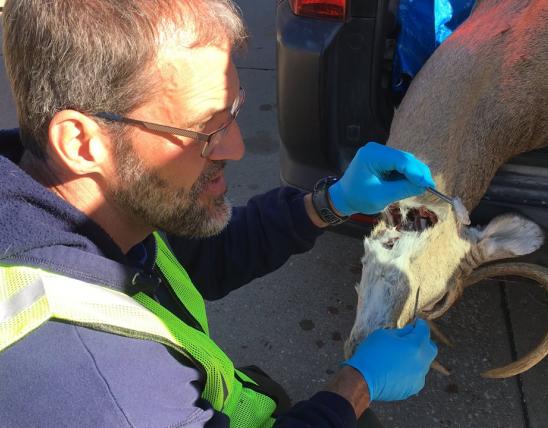
Remove hide from the deer and bone out the tail. At this stage, because it is fresh, the hide is referred to as a green hide. To remove the hide, cut a ring around the neck, legs, and genitals with a sharp knife, then continue the center cut from field dressing the animal outward to the legs. Next, put away the sharp knife safely and use a butterknife and gloved hands to remove the hide from the animal to avoid cutting holes in the hide.
Scrape as much fat and flesh from the hide as possible. To avoid cutting the hide, use an old butterknife, a mussel shell, or other dull metal edge. A pressure washer may expedite this process. Holes in the hide can be patched later using a sharp needle and thread with a baseball stitch.
Processing the hide
If you aren’t ready to process the hide immediately, fold it skin-to-skin, roll it tightly, and freeze it. If freezer space is limited, hides can be thoroughly scraped of all fat and flesh then salted with non-iodized salt and rolled hair side out once dried. Hides stored in this way are best processed prior to warm weather and must be closely monitored for spoiling or souring.
When ready, thaw the hide and submerge it in water until the hair slips off of the hide with a gentle tug. Change the water once or twice daily. If it develops an odor, increase water changes. This controlled aging, called retting, breaks down the hide around the hair follicles. Depending on the ambient temperature, this may take from two days to two weeks.
A 5-gallon bucket or large tote will hold most hides. The hide must remain submerged. Place a bucket and/or weights on top of the hide to keep it beneath the water’s surface. Place the hide in an area that remains above freezing. If it freezes, thaw your hide and continue.
Fleshing the hide
Next, flesh the hide. This step removes the last of the fat and muscle from the hide, which prevents it from spoiling. Drape the hide over a fleshing beam and pin it in place with your body. A simple fleshing beam can be constructed by attaching a 6-foot piece of heavy-walled 4-inch PVC pipe at a downward angle to a 4-foot wooden triangle with a ratchet strap. Smooth the ends of your PVC using sandpaper to remove any sharp edges. Your fleshing beam can be wider or narrower, but it needs to be smooth to avoid cutting the hide.
A dull knife is recommended for scraping the hide because there is less danger of cutting it. A fleshing knife or blade can be purchased from a vendor that sells trapping or taxidermy equipment. It has a handle on each side in line with the blade. It is usually a mild steel blade, although 1905 high carbon steel or stainless steel can be used. Possible substitutes include a smooth-edged hoe or putty knife with corners rounded off. A dulled or used mower blade or board planer may also be used. Avoid sharp edges for safety and to avoid cutting the hide. Historically, the lower leg bone of a deer, called the cannon bone, was used as a scraper.
Take a moist, soaked hide and place it on a fleshing beam with the inner side (muscle side) facing up. Orient the hide so the neck end is towards you, and the tail end is down the beam towards the floor. Work from neck to tail.
Proper stance is important to reduce muscle strain. Bend your legs slightly, tense your stomach muscles slightly, and relax your shoulders. As you work, lock your wrists. Movement comes from your arm.
You will be pushing the fat and flesh down the beam, away from you, and off the hide. You need to break through the membrane to get to the skin itself. It is much easier to continue than it is to start.
Work in the area close to you. Work in short strokes; avoid large arm movements or excessive leaning over. You have the most control right in front of you, within arm’s length. You will move the hide frequently on the beam.
The flesh side will require a steeper angle of your fleshing knife than the fur side. Try different angles to get a feel for what works best for you. You want to reach the white of the hide. Avoid going sideways with your fleshing knife. Work on the top of the beam, avoid the sides. Keep the hide flat on the beam.
Your energy needs to be concentrated on the spot between the scraped part and the unscraped part. Running your fleshing knife over the top of the flesh will waste your energy. Re-wet hide as needed.
Once the main area of hide is fleshed, turn the neck towards you and decide if you are up for scraping it. Because the neck skin is much thicker, this area of the hide will be more difficult to work with than the rest of the hide. Take a moment to clean up the flesh and muscle bits as they are slippery and easy to trip over. You are now ready to remove the hair and grain.
Graining the hide
To grain the hide, begin with the neck end toward you. The grain of the hide is the natural surface of the hide, the outmost tough and durable layer. If you have removed the neck and tail, you can orient the hide from the direction of the hair. The hair lays down from the neck towards the tail. Grain in the same direction the hide lays. Remember: you are pushing the grain off the hide, not slicing or cutting it off.
Graining requires putting a lot of downward pressure on your fleshing tool. Use short and powerful strokes. If you scrape past where the hairline is, you are wasting your energy. Concentrate your energy into the parts between where the hair and grain are versus where they are not.
Remove both the hair and the grain beneath it for a good, smooth product. The grain is the shiny part of shoe leather. Overlap strokes by about 50 percent to ensure you’re getting past the slick grain and expose the rougher flesh beneath. Work down the hair rather than sideways. Frequently wipe the hair and grain from your fleshing knife.
Begin by graining a strip an inch or two thick across the shoulders right behind the neck. This will make it easier to work down the hide. Find a technique that works for you. Some find it easiest to make an upside-down V-shape down the hide, then remove the hair in the center to form a triangle.
Drying the hide
Once both sides of your hide are cleaned up (free from hair, fat, and membrane), it is time to stretch and dry the hide. Construct a simple wooden frame around 2 feet longer and wider than your hide. Rawhide shrinks as it dries and can twist and snap wood. An average deer will require a frame around 6 feet by 6 feet. Four 2-by-4 boards secured in each corner with a carriage bolt work well for making a simple frame.
Make a small hole in one corner of your hide at least a quarter inch from the edge with an awl, ice pick, or nail. Immediately run a piece of twisted cotton string through the hole. Repeat this for the remaining corners, then tie the strings to the frame, gently stretching the hide as you tie the hide to the frame. Some of the first strings you tie may become loose and need to be retied as you proceed. Next, attach and tie strings halfway between corners to stretch the hide further. Repeat adding strings halfway between existing ties until strings are attached every inch or two around the hide.
Finished rawhide is strong, durable, and versatile. It can be shaped into knife sheaths, drumheads, or bindings for tools, cut into cordage or bowstrings, used to back bows, or even later tanned into buckskin leather.
Ginger Miller, Ph.D., is a conservation educator for MDC’s Kansas City region.
TJ Peacher is the education district supervisor for MDC’s Kansas City and Northwest regions.


Also In This Issue

Project FeederWatch taps into backyard birdwatching to fuel science

Examples and Tips from MDC Photographers
And More...
This Issue's Staff
Editor – Angie Daly Morfeld
Associate Editor – Larry Archer
Photography Editor – Ben Nickelson
Staff Writer – Kristie Hilgedick
Staff Writer – Joe Jerek
Staff Writer – Dianne Van Dien
Designer – Marci Porter
Designer – Kate Morrow
Photographer – Noppadol Paothong
Photographer – David Stonner
Circulation – Marcia Hale