


Hi, I’m Nop. I’m a nature photographer. I take photos of animals, plants, and wild places for Xplor. Nature photographers often use fancy cameras and expensive lenses. But I can teach you tips that will make getting great shots a snap — no matter what kind of gear you use. Grab your camera, and let’s go!
Get the Right Light
Did you know that the word “photography” means “to write with light”? To be a better photographer, start paying attention to how the direction and character of light changes the way your subject looks.
Direction
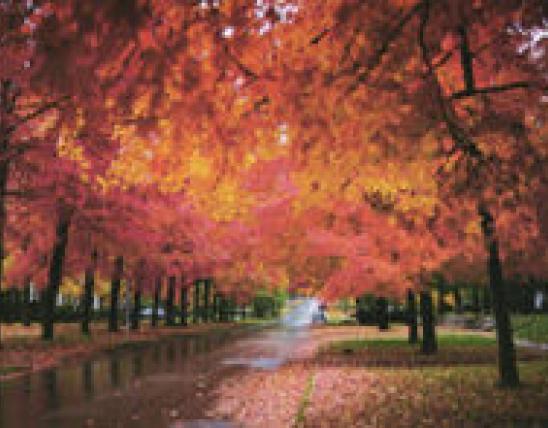
Front lighting is when light shines on the parts of your subject that face the camera. This kind of lighting shows all the details of your subject and makes it look bright and clear.
Back lighting is when light shines on the parts of your subject that face away from the camera. In other words, the light is behind your subject. This creates a dramatic “halo” around the edge of your subject, but color and details often disappear in dark shadows.
Side lighting is when light shines on the side of your subject. This creates shadows. Shadows can sometimes make your photo look more 3-D, but they can also cause details to disappear in the dark parts of the image. If you’re not sure what direction of light is best for your photo, try front lighting first.
Character
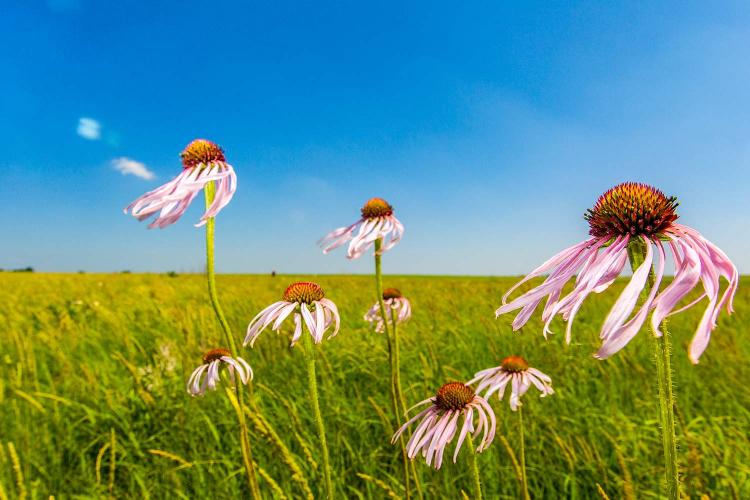
Besides having a direction, light also has character. It can look warm or cool, soft or harsh. Morning light looks warm and golden. (So does evening light.) Afternoon light often looks cool and harsh.
There’s no reason to stay inside when it’s cloudy. Overcast days are perfect for photographing flowers and insects. The soft light makes colors pop. Just don’t forget to pack a raincoat!
Zoom With Your Feet
On smartphones, you can pinch the screen to zoom in on that bird you’re trying to photograph. Don’t do it! This will make your photo look grainy. It’s much better to use a different piece of gear — your feet — to get as close as you can to your subject.
To sneak up on jittery critters, avoid walking right at them. If you do, they’ll scurry, slither, or fly to the next county. Try this trick instead: Pretend you’re out for a stroll and couldn't care less about the animal. Zigzag back and forth — la, la, la — as you approach. Take... your... time. If the animal looks nervous, stop. Just sit still and do nothing. When the critter calms down, keep going.
Stay Focused
The flashiest flower won’t look fantastic if your photo is out of focus. (Try saying that five times fast!) Blurry pics happen because either your camera or your subject is moving.
To hold my camera steady, I use a tripod. No tripod? No problem. You can turn your body into a tripod by sitting down and propping your arms on your knees. Or just prop your camera on a log or rock.
Getting your subject to hold steady is a different story. It’s easy to get a plant to be still. Just wait for the wind to quit blowing. Animals are tougher, especially energetic critters like birds and chipmunks. Take lots of shots to try to capture the animal at the peak of its action. And don’t quit shooting until after the moment has passed.
Do Your Homework
One of my best tips is really simple: learn about your subject. To be a better nature photographer, be a better naturalist. Read Xplor, study field guides, watch nature videos, and get outside as much as possible. The more you know, the more you’ll see to photograph.
Frame Game
How you place your subject in the frame can make or break a photo. Photographers call this composition. Follow these tips to create interesting, eye-popping compositions.
If you don’t know where to start, try the rule of thirds. Pretend your camera frame is divided into thirds like a tic-tac-toe grid. Place your subject where the horizontal and vertical lines cross.
Beginners often place their subject dead center in the frame. Usually it’s more interesting to give a plant or animal room to roam. Try placing it off to one side. This also helps show a bit of the habitat where it lives.
Don’t shoot everything from your perspective. Get eye-to-eye with your subject — even if it doesn’t have eyes. Crouch down to include the blue sky behind a prairie flower. Lie on your belly to shoot a crawling bug. Focus on an animal’s eyes, and you’ll get a peek at how it sees the world.
Pay attention to what’s behind your subject. There’s nothing worse than discovering a branch sticking up awkwardly behind a squirrel’s head after it’s too late to retake the shot. Move in close so your subject fills most of the frame. That way, it doesn’t have to compete with a busy background.
Show Some Respect
No picture is worth more than the safety of your subject. Don’t expose a robin’s nest to the elements just to get a good shot. Don’t dig up a clump of coneflowers just to move them to a prettier place. Don’t keep a mama cottontail away from her hungry babies. Don’t harm what you love.


Also In This Issue
And More...
This Issue's Staff
Les Fortenberry
Karen Hudson
Angie Daly Morfeld
Noppadol Paothong
Marci Porter
Mark Raithel
Laura Scheuler
Matt Seek
David Stonner
Nichole LeClair Terrill
Stephanie Thurber
Cliff White